
Metal Roof L-Foot Solar Mounting System: Complete Buyer’s Guide (2026)
Direct answer: A metal roof L-foot is the L-shaped bracket that connects solar mounting rails to a metal roof. It transfers panel wind and snow loads into the roof structure while an EPDM gasket seals the penetration. Standard material is 6005-T5 anodized aluminum; standard size is 4-6 mm thick with a 50-70 mm base. Cost runs USD 0.60 to 2.50 per piece at container volume. A typical 10 kW residential system uses 20 to 40 units. VOLCRIX manufactures L-feet, rails, and mounting components in Yueqing, Wenzhou — ISO 9001 and IATF 16949, 35 years of precision metal manufacturing. See our L-foot bracket specifications and request a quote →
Need Metal Roof L-Foot Solar Mounting Brackets?
Free DFM review · Quote within 24 hours · Prototype in 7-15 days
What Is a Metal Roof L-Foot?
An L-foot — also called an L bracket, L-foot bracket, or solar L feet — is an L-shaped structural component used in photovoltaic mounting systems to connect aluminum rails to the roof surface. The name comes from its shape: a vertical leg and a horizontal leg meeting at 90 degrees.
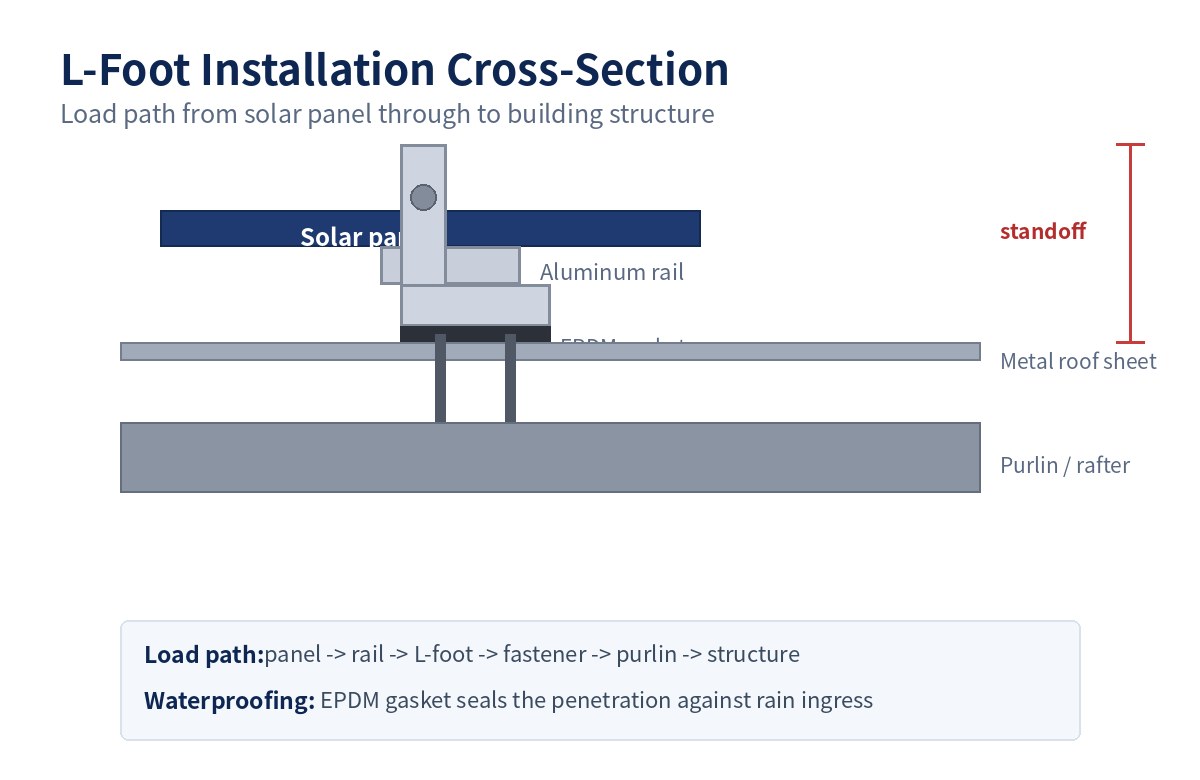
The vertical leg connects to the solar rail through an M8 or M10 bolt, usually with a T-bolt that slides inside the rail’s extruded channel. The horizontal leg attaches to the metal roof sheet with self-drilling fasteners that penetrate the roof sheet and anchor into the purlin or rafter underneath. Most L-feet carry a pre-installed EPDM rubber gasket on the base plate to seal the penetration point against water ingress.
L-feet serve three functions at once:
- Structural transfer — moving wind uplift, snow load, and module dead load from the rail into the roof structure
- Height control — setting the rail’s standoff distance above the roof surface, which controls airflow clearance under the panels
- Waterproofing — sealing the fastener penetration through the metal sheet
L-Foot vs Hanger Bolt vs Z-Bracket: Which One for Your Roof?
Three attachment methods dominate metal roof solar mounting. They are not interchangeable — the right one depends on your roof profile and structural depth.
| Parameter | L-Foot | Hanger Bolt + L-Foot Adapter | Z-Bracket |
|---|---|---|---|
| How it attaches | Bracket body sits on roof, fastened through sheet into purlin | Threaded rod driven through sheet into rafter; adapter threads onto exposed stud | Bracket mounts module directly to roof profile without a rail |
| Best roof type | R-panel, trapezoidal, corrugated | Corrugated, trapezoidal — where fastener must reach deep structure | Shingle and tile roofs; small arrays |
| Rail required? | Yes — L-foot supports a rail | Yes — adapter supports a rail | No rail — modules bolt straight on |
| Penetration depth | Sheet + purlin (20-50 mm) | Sheet + rafter (80-150 mm) | Sheet + decking |
| Waterproofing | EPDM gasket on base plate | EPDM washer under flange nut | EPDM gasket per bracket |
| Adjustability | Slotted holes allow in-field alignment | Limited — stud position fixed | Limited |
| Relative cost | Lowest per attachment point | Medium — extra bolt and adapter | Medium — more hardware per module |
| Typical use | Commercial and residential metal roof arrays | Older or thin metal roofs needing deep anchorage | Small residential arrays, tight spaces |
The practical rule: if your roof has accessible purlins or rafters within 50 mm of the roof surface, use L-feet with direct fasteners. If the structure sits deeper — common on older corrugated roofs with deep wave profiles — use a hanger bolt system. Z-brackets only make sense when you are mounting a small number of panels on a shingle or tile roof and want to skip the rail entirely.
Metal Roof Types and L-Foot Compatibility
Not all metal roofs accept the same L-foot geometry. The bracket profile and the gasket shape must match the roof’s surface profile, or the gasket will not seal.
Trapezoidal Roof
The most common commercial metal roof profile. Panels have a flat top with sloping sides, forming a trapezoid cross-section. Fasten L-feet at the high rib — never in the valley. Gasket is usually flat-backed, sitting on the rib’s flat crown. Rib pitch is typically 200 to 400 mm.
Corrugated Roof
Sine-wave profile with rounded ridges. Requires a contoured gasket or a saddle-shaped bracket seat because a flat base cannot make full contact on a curved surface. Fasten at the crest. This profile frequently needs hanger bolts because the crest-to-purlin distance can exceed 60 mm on older roofs.
R-Panel Roof
Ribbed panel with a wide, flat top and vertical or near-vertical ribs. The easiest metal roof for L-foot installation — the flat top gives full gasket contact and the purlin usually sits within 30 to 50 mm. Fasten at the flat top, staying at least 25 mm back from the rib edge.
Standing Seam Roof
A raised folded seam runs lengthwise. Do not drill through a standing seam roof. The seam is the waterproofing element — penetrating it voids most roof warranties. Use a non-penetrating seam clamp instead, which grips the seam mechanically and provides a threaded stud for rail attachment. L-feet are the wrong product for standing seam roofs.
Material Selection: Aluminum, Stainless, or Coated Steel
Material choice determines service life. In a 25-year solar system, the bracket must survive 25 years of UV, thermal cycling, rain, and — in coastal installations — salt spray.
| Material | Grade | Corrosion Resistance | Relative Cost | Best For |
|---|---|---|---|---|
| Anodized aluminum | 6005-T5 extruded | Good — anodizing protects to 12-25 microns | Baseline | Inland and moderate environments (most projects) |
| Stainless steel | SUS 304 / A2 | Very good — no coating to fail | 3-5x aluminum | Coastal, industrial, high-humidity sites |
| Stainless steel | SUS 316 / A4 | Excellent — molybdenum resists chlorides | 4-6x aluminum | Offshore, salt-spray, chemical plants |
| Zn-Al-Mg coated steel | ZAM / SuperDyma | Good — self-healing cut edge | 1.3-1.8x aluminum | Mid-cost alternative, moderate environments |
| Galvanized steel | Hot-dip per ASTM A123 | Moderate — coating erodes in coastal air | Lowest | Dry inland installations only |
The Galvanic Corrosion Trap
This is the most expensive mistake in solar mounting. When bare aluminum contacts uncoated carbon steel in the presence of moisture and salt, the aluminum becomes the sacrificial anode and corrodes rapidly — white oxide blooms around the fastener within two to three years, and the bracket loses section thickness at exactly the point carrying the load.
The fix is straightforward: match metal families or isolate them. Use stainless steel fasteners with aluminum brackets (the potential difference is small enough to be acceptable with anodized aluminum). Never use zinc-plated carbon steel bolts with bare aluminum. If you must mix, use a nylon isolating washer under the fastener head and around the shank.
Standard Specifications and Dimensions
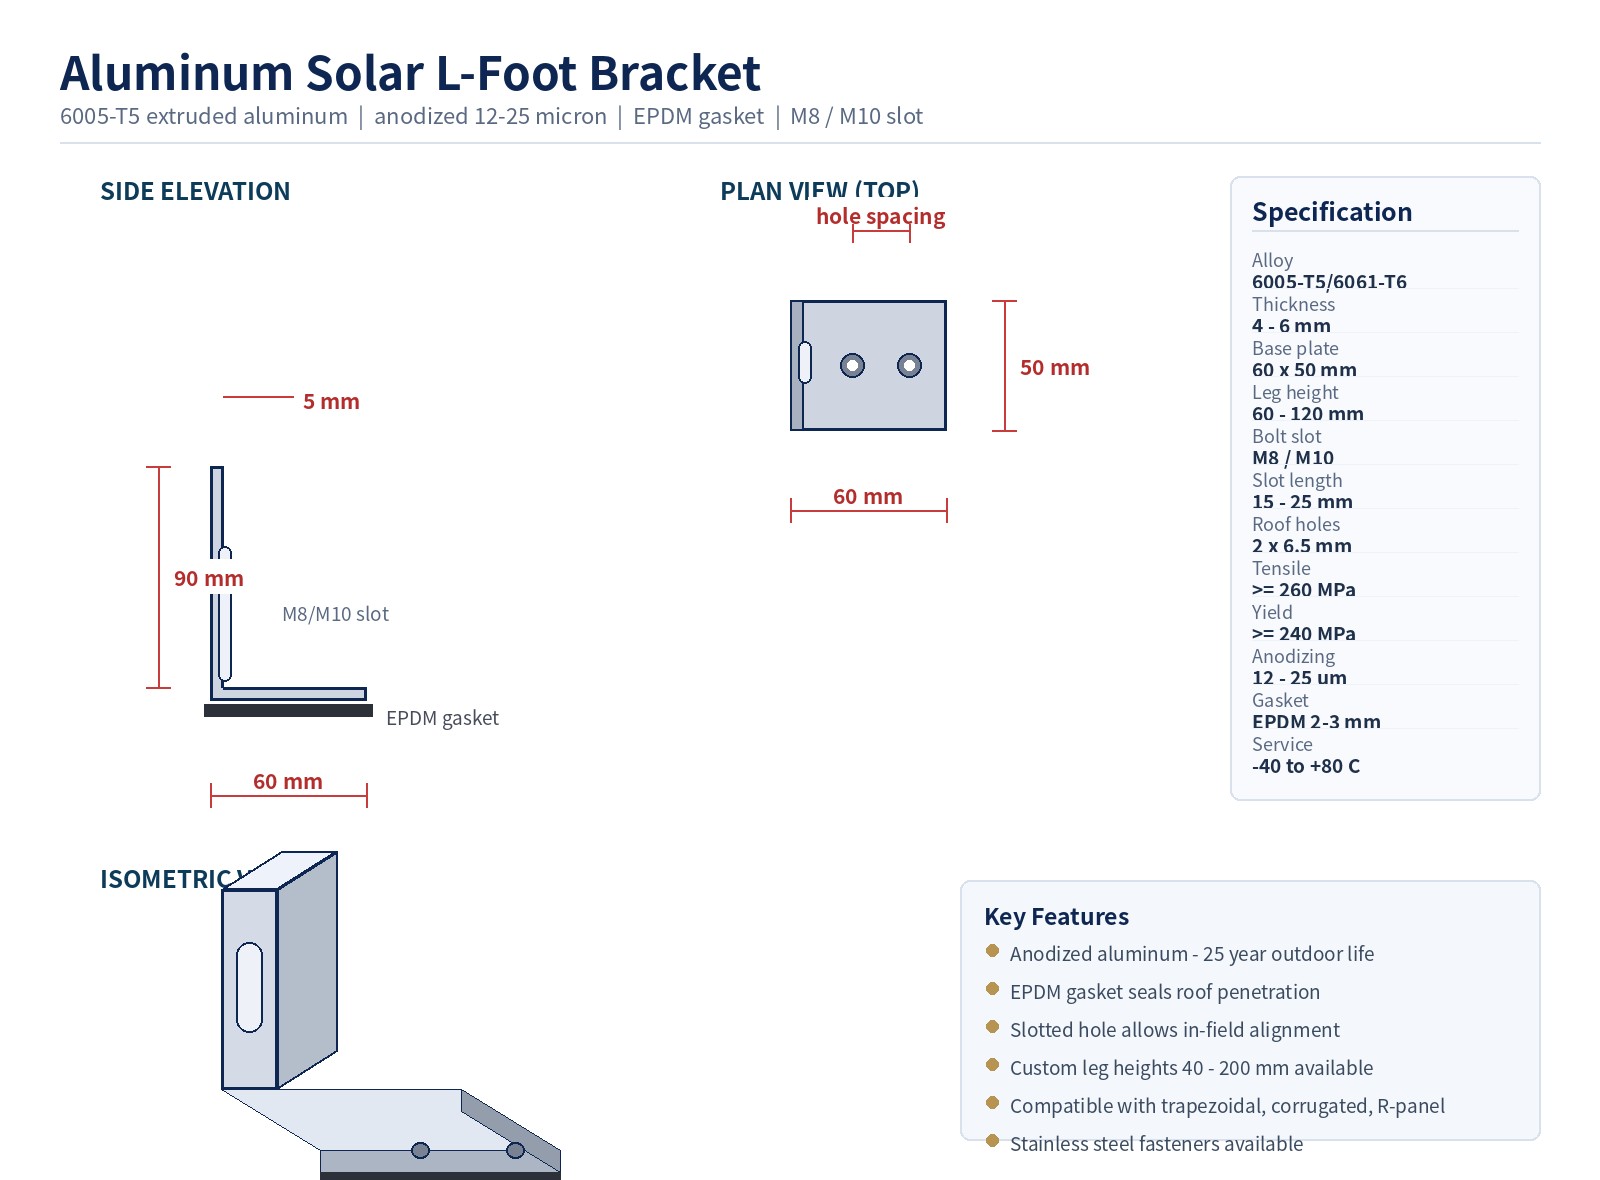
When you specify L-feet, these are the dimensions and properties that matter. Use this table as a starting checklist for your RFQ.
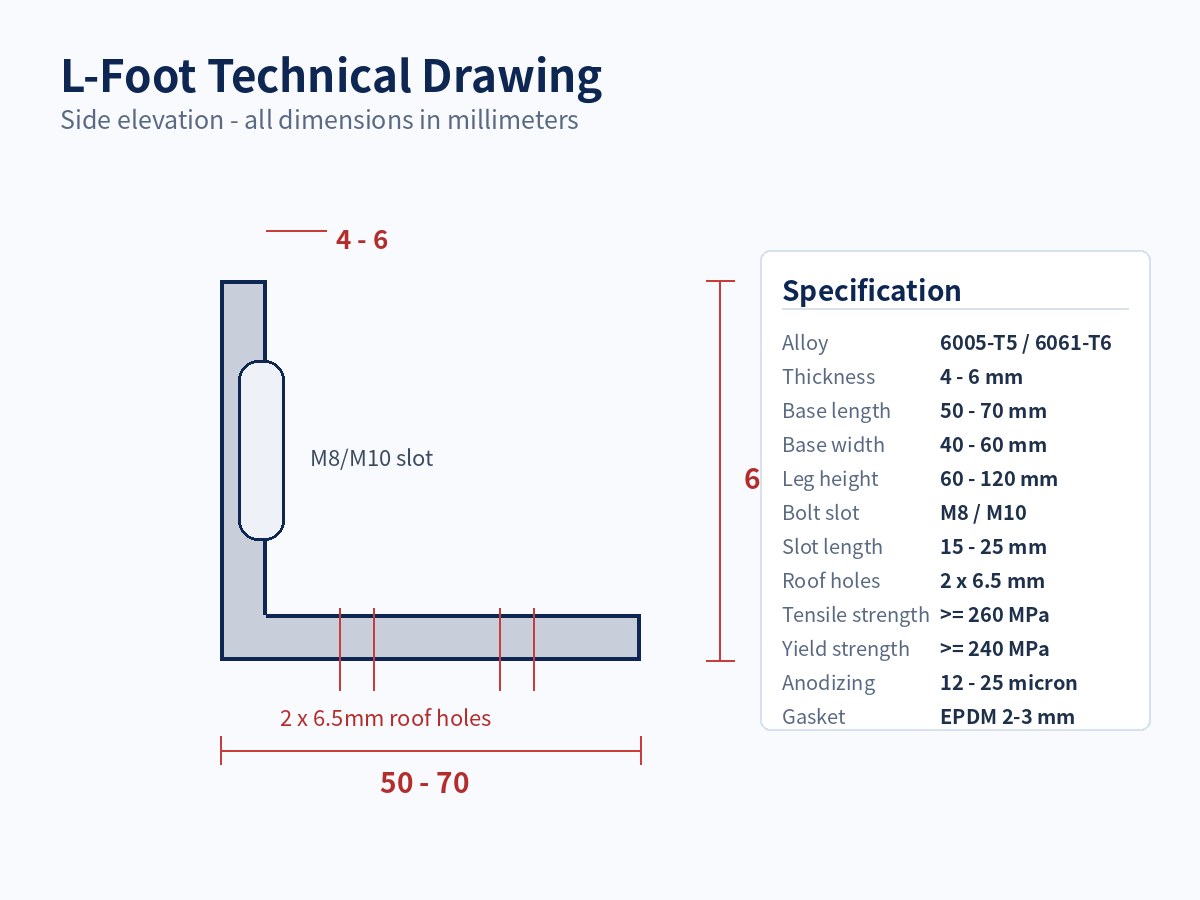
Typical 6005-T5 Aluminum L-Foot Specification
- Alloy: 6005-T5 extruded aluminum (or 6061-T6 for higher strength)
- Material thickness: 4 mm to 6 mm
- Base plate length: 50 mm to 70 mm
- Base plate width: 40 mm to 60 mm
- Vertical leg height: 60 mm to 120 mm (sets rail standoff)
- Bolt slot: M8 or M10 slotted hole, slot length 15-25 mm for alignment
- Roof fastener holes: 2 holes, 6.5 mm diameter for M6.3 screws
- Tensile strength: ≥260 MPa | Yield strength: ≥240 MPa
- Anodizing: 12-25 microns (Class II per MIL-A-8625), clear or black
- Gasket: EPDM, 2-3 mm thick, shore A 60-70, UV-stabilized for 25 years
- Fasteners (if supplied): SUS 304 A2-70 bolts and self-drilling screws
- Load rating: Refer to racking manufacturer span table — typically 1.4 kN vertical per attachment point
- Temperature range: -40 °C to +80 °C service
If your project needs a non-standard height — common on roofs with insulation or a need for extra airflow clearance — L-feet can be extruded to any leg height without new tooling, because extrusion dies set the cross-section, not the cut length. Custom heights from 40 mm to 200 mm are routine.
Wind Load, Snow Load, and Spacing Calculations
The single biggest source of failed solar arrays is under-spaced attachments. The bracket itself rarely breaks — what fails is the fastener pulling out of the purlin or the rail deflecting beyond limits under wind uplift.
Governing Standards by Region
- United States: ASCE 7-16 or ASCE 7-22 — determines design wind pressure based on wind speed map, exposure category, roof height, and zone (field vs perimeter vs corner)
- Australia / New Zealand: AS/NZS 1170.2:2021 — regional wind speeds from A0 to D, plus terrain and shielding multipliers
- Europe: EN 1991-1-4 (Eurocode 1) with national annexes — basic velocity pressure plus pressure coefficients
- Middle East / Asia: Often project-specific, frequently referencing ASCE or Eurocode
Typical Design Values
- Design wind speed: 40 m/s (144 km/h) for inland Europe and moderate US zones; 50-60 m/s for coastal and cyclone regions
- Snow load design: 1.4 kN/m² for light snow regions; 2.4 kN/m² and above for alpine and northern Europe
- Typical attachment spacing: 1.2-1.8 m along the rail for inland residential; 0.9-1.2 m in high-wind coastal zones; corner and perimeter zones need 30-50 percent tighter spacing than field zones
- Rail span between L-feet: governed by the rail’s own structural capacity — check the manufacturer’s span table, do not exceed it
Installation: Torque, Gaskets, and the Five Mistakes to Avoid
Correct Installation Sequence
- 1. Mark attachment positions along the rail line, using the calculated spacing — tighten spacing at roof edges and corners
- 2. Verify the purlin or rafter location — use a stud finder or drill a small pilot hole. Do not assume the purlin runs where you expect
- 3. Position the L-foot with the EPDM gasket flush against the roof sheet, on the high rib for trapezoidal and on the flat top for R-panel
- 4. Drive roof fasteners through the bracket into the purlin — two fasteners per bracket minimum
- 5. Set the rail into the L-foot vertical leg, insert the M8 T-bolt, and torque to specification with a calibrated wrench
- 6. Hose-test three or four complete attachments before completing the array — a five-minute check that prevents call-backs
Torque Values
| Fastener | Size | Typical Torque | Notes |
|---|---|---|---|
| Rail-to-L-foot bolt | M8 stainless A2-70 | 15-20 N·m (11-15 ft-lb) | Follow manufacturer table — varies by system |
| Roof self-drilling screw | M6.3 into steel purlin | 8-12 N·m | Snug, not crushed — gasket should deform slightly, not flatten |
| Hanger bolt flange nut | M10 | 20-25 N·m | EPDM washer under the nut |
Use a calibrated torque wrench. An impact driver will over-torque an M8 bolt past 40 N·m in under a second, crushing the gasket and creating a leak path that shows up months later.
Five Installation Mistakes That Cause Failures
- Fastening only into sheet metal. The roof sheet is 0.4-0.6 mm steel. It cannot hold wind uplift. Fasteners must reach the purlin or rafter below. If the purlin is not where you need it, re-plan the layout — do not fasten to sheet.
- Omitting or mis-seating the EPDM gasket. A gasket folded under the bracket edge, or one that fell off during positioning, produces a leak at the first heavy rain. Check every bracket before driving fasteners.
- Over-torquing with an impact driver. Crushes the gasket, deforms the base plate, and can crack the bracket at the bend radius. Use a torque wrench.
- Uneven base contact on profiled roofs. On corrugated profiles, a flat bracket base only touches at one point. The correct answer is a contoured gasket or a saddle seat — not more torque to force contact.
- Mixing aluminum brackets with uncoated steel fasteners. Galvanic corrosion. Anodized aluminum with stainless fasteners is fine. Bare aluminum with zinc-plated carbon steel is not — the aluminum corrodes away around the fastener hole within two to three seasons in coastal air.
Cost Structure: What Drives the Price
L-foot pricing is not arbitrary. Five variables explain almost all price differences between quotes.
- Material and grade — 6005-T5 aluminum is baseline; SUS 304 is 3-5x the material cost; SUS 316 is 4-6x
- Anodizing thickness — 10 microns is minimum, 15-25 microns is standard for outdoor solar, and thicker anodizing adds 10-25 percent to cost
- Extrusion complexity — simple L cross-section is cheapest; adding a stiffening rib, drainage channel, or integrated washer seat increases die cost and piece price
- Gasket quality — UV-stabilized EPDM rated 25 years costs two to three times more than generic neoprene, and it is the difference between a sealed roof and a leaking one
- Volume and packaging — 10,000+ pieces with bulk packaging is the price point most quotes assume; smaller quantities carry a per-piece premium of 20-50 percent
Indicative pricing at container volume (10,000+ pieces), 6005-T5 clear anodized, EPDM gasket included, fasteners excluded:
| Configuration | Indicative Unit Price (USD) |
|---|---|
| Standard L-foot, 4 mm, 60 mm base, clear anodized | 0.60 – 0.95 |
| Heavy L-foot, 6 mm, 70 mm base, 25 micron anodized | 1.10 – 1.80 |
| Custom height (120 mm+ leg), black anodized | 1.50 – 2.50 |
| SUS 304 stainless steel equivalent | 2.50 – 6.00 |
| With stainless fasteners and EPDM washer kit | Add 0.30 – 0.60 |
A 10 kW residential system uses 20 to 40 L-feet depending on roof layout and wind zone. At 0.80 USD per piece, that is 16 to 32 USD of bracket hardware in a system costing several thousand dollars — a small line item carrying a disproportionate share of the structural risk. This is not the place to save the last 10 percent.
The specification table on our L-foot bracket product page lists the exact alloy grades, thickness options, anodizing ranges, and gasket specifications we produce — useful as a comparison baseline when you receive quotes from other suppliers.
How to Evaluate an L-Foot Supplier
Most L-feet look identical in photos. They are not. Here is what to check before placing an order.
- Material certificate. Ask for the aluminum mill certificate showing alloy designation 6005-T5 with measured tensile and yield strength. A supplier who cannot produce this is buying on the spot market without traceability.
- Anodizing thickness data. Require XRF or eddy-current measurements, minimum 12 microns, and ask which standard they test to. ASTM B568 and ISO 2360 are the usual methods.
- Gasket specification. EPDM, UV-stabilized, shore A 60-70 hardness, rated for 25 years outdoor exposure. Ask for the gasket material datasheet — generic “rubber gasket” is a red flag.
- Fastener grade. SUS 304 (A2-70) or SUS 316 (A4-80). Never accept zinc-plated carbon steel with aluminum brackets.
- Sample and hose test. Order three brackets and install them on an off-cut of your actual roof profile. Hose-test for 10 minutes. This 30-minute test eliminates most of the risk.
- Quality system. ISO 9001 minimum. IATF 16949 if the supplier also serves automotive — it signals process discipline even if your project is solar.
- Custom capability. Can they extrude a custom leg height or add a drainage channel? If they only sell standard stock, they are a trader, not a manufacturer.
Beyond L-Feet: Complete Solar Mounting Bracket Systems
L-feet are the component that connects a rail to a metal roof — but many projects need more than brackets. VOLCRIX also manufactures the wider family of solar mounting hardware, from pole-mounted bracket assemblies to tilt frames, so the same factory, the same quality system, and the same tolerance control cover the whole mounting package.
Pole-Mounted Bracket Systems
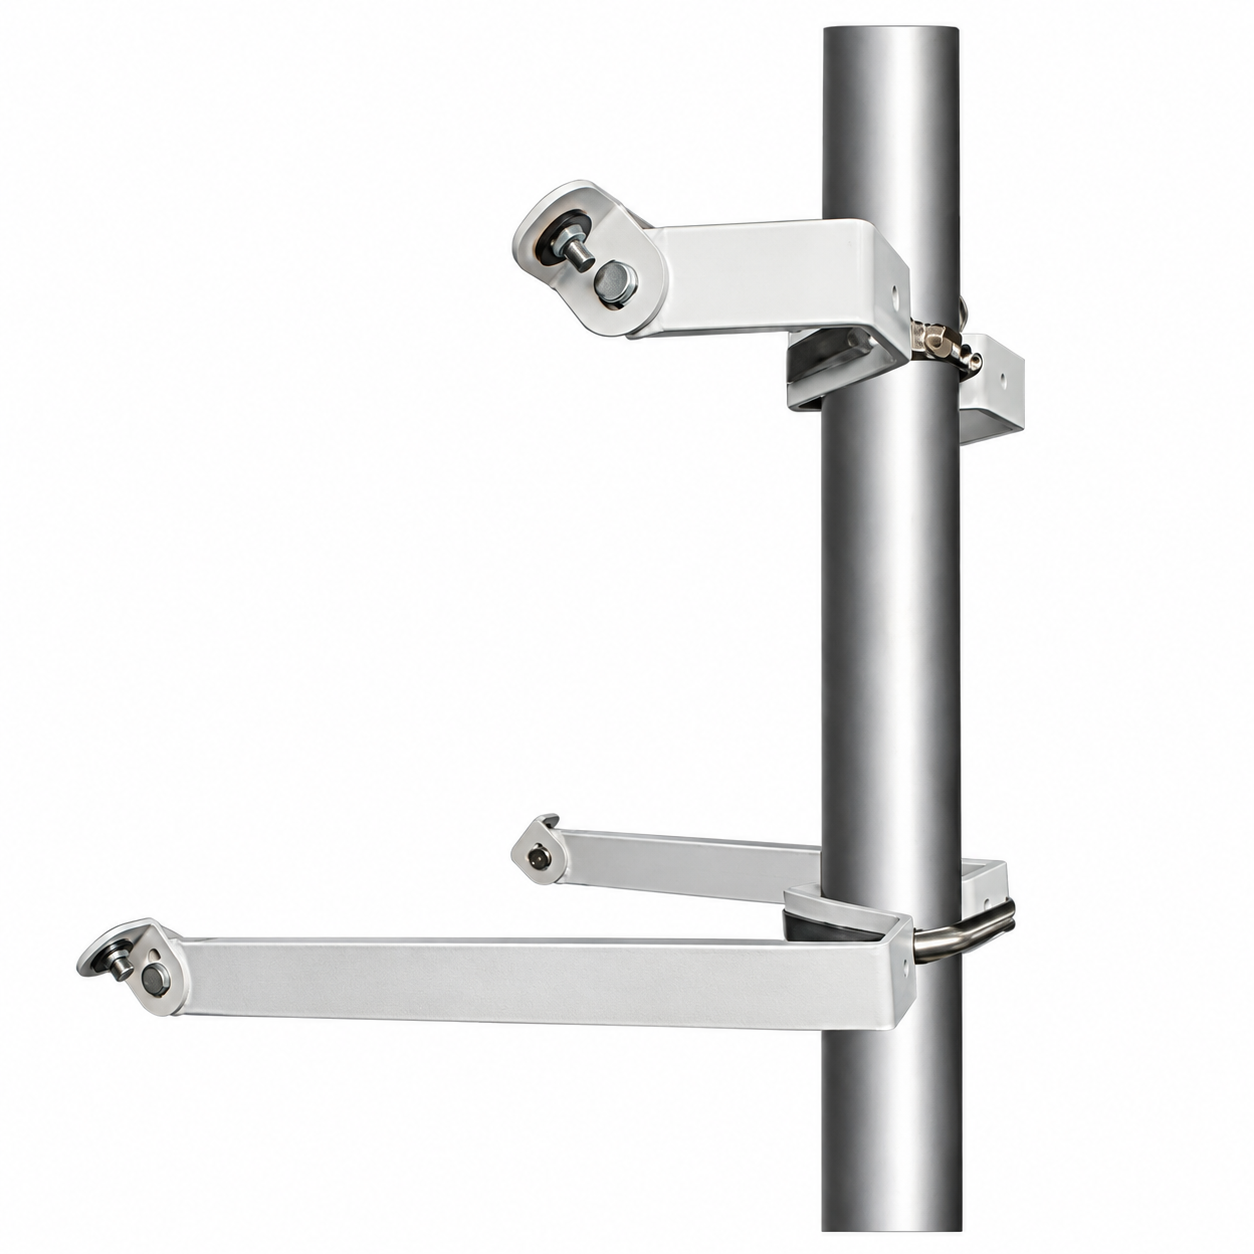
For ground arrays, carports, and sites where roof penetration is not acceptable, solar panels mount to a structural pole rather than a roof surface. The bracket assembly clamps to the pole with U-bolts and provides an adjustable L-bracket interface for the mounting rail. Because the clamp position is infinitely adjustable along the pole, installers can set row spacing, tilt angle, and vertical offset on site without custom fabrication.
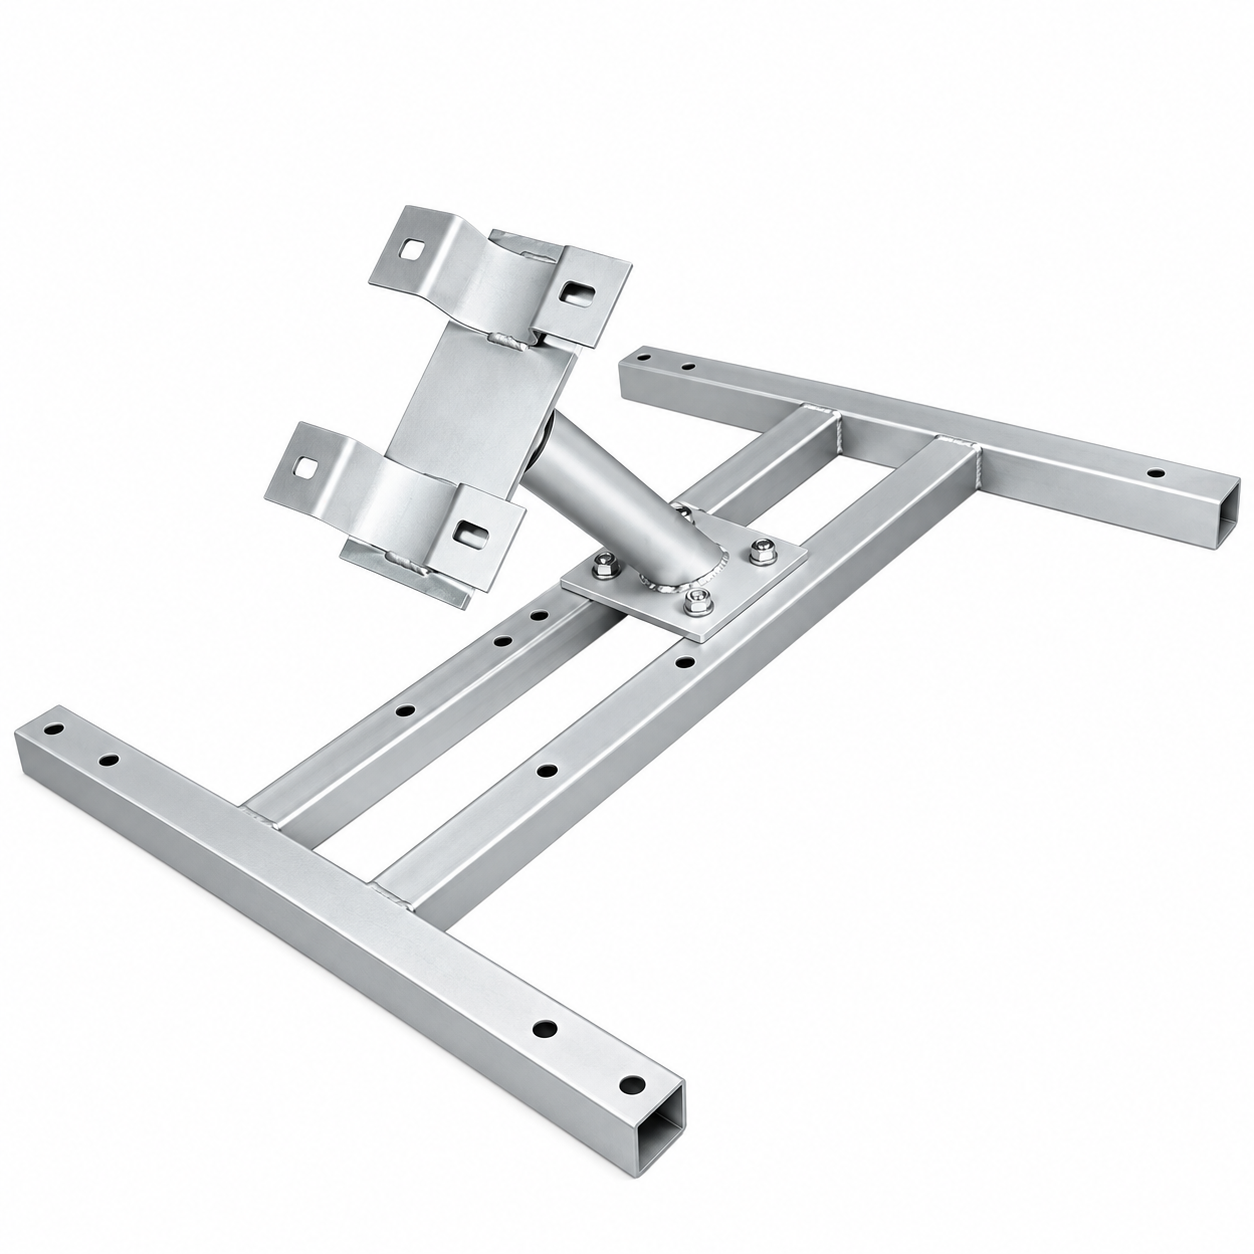
Stainless steel pole-mount brackets (SUS 304 or 316) are the usual specification for coastal and high-humidity sites, where anodized aluminum clamps that remain in permanent contact with a steel pole would be at risk from galvanic corrosion. The U-bolt is always stainless, regardless of bracket material.
Tilt Frame and Adjustable Mounting Systems
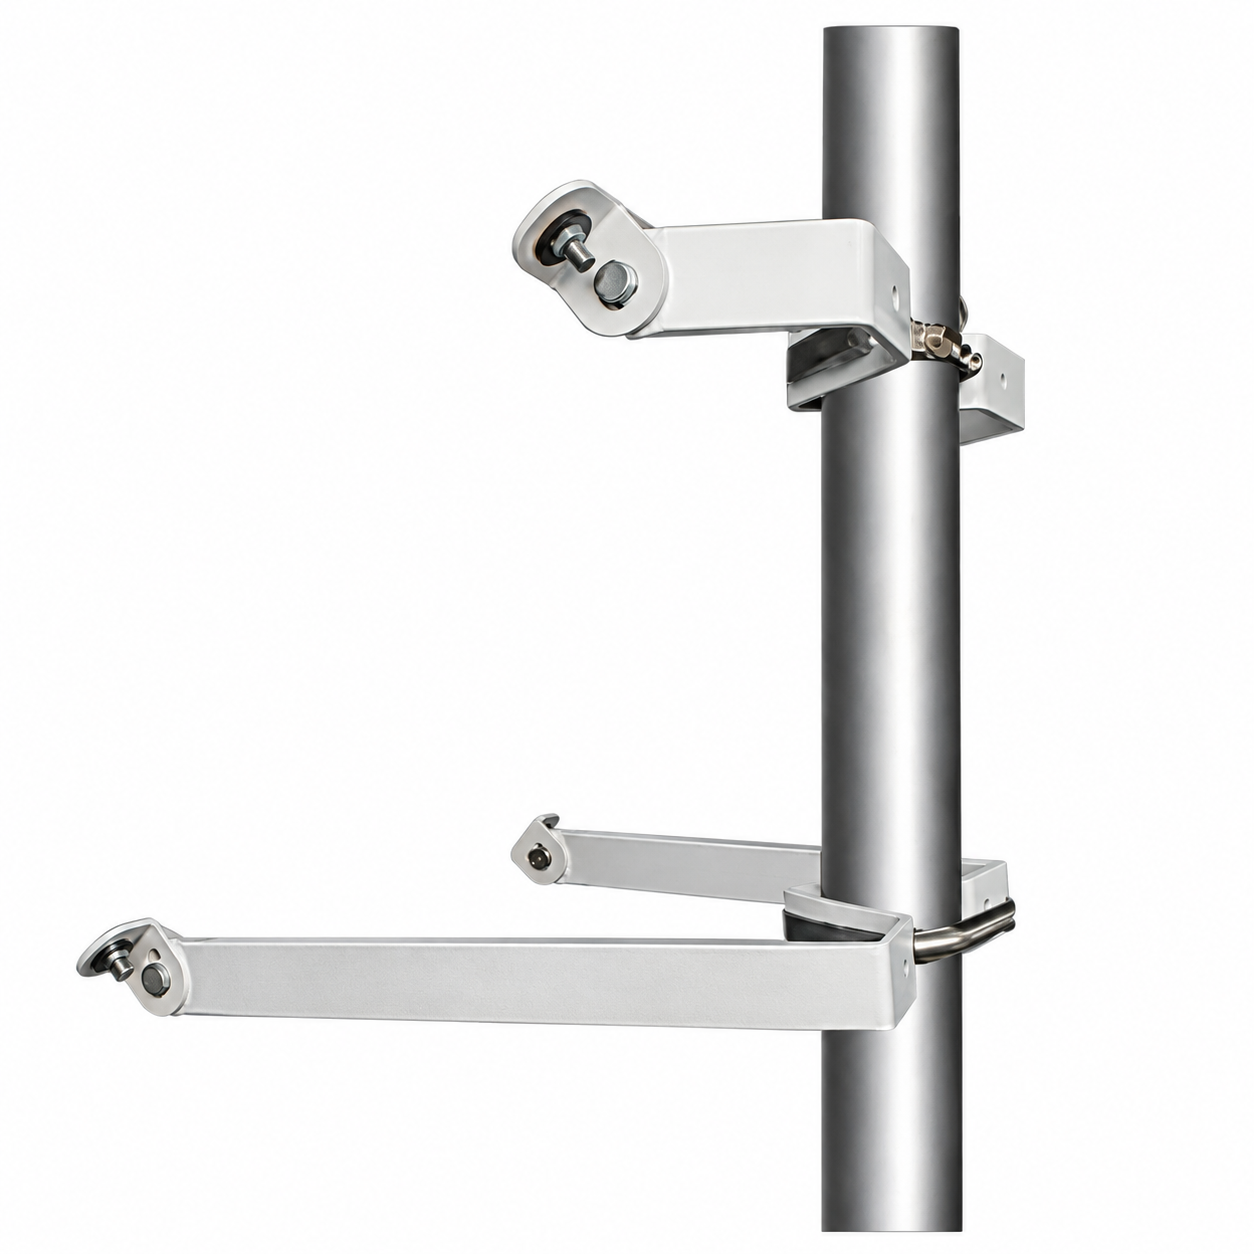
Fixed-tilt mounting frames hold the modules at a set angle toward the equator — commonly 20 to 35 degrees depending on latitude — and are used on flat roofs, ground mounts, and ballasted systems. The frame combines base rails, support legs, and the mounting rails that carry the modules. Material is typically 6005-T5 aluminum for the frame with hot-dip galvanized steel or stainless hardware at the joints.
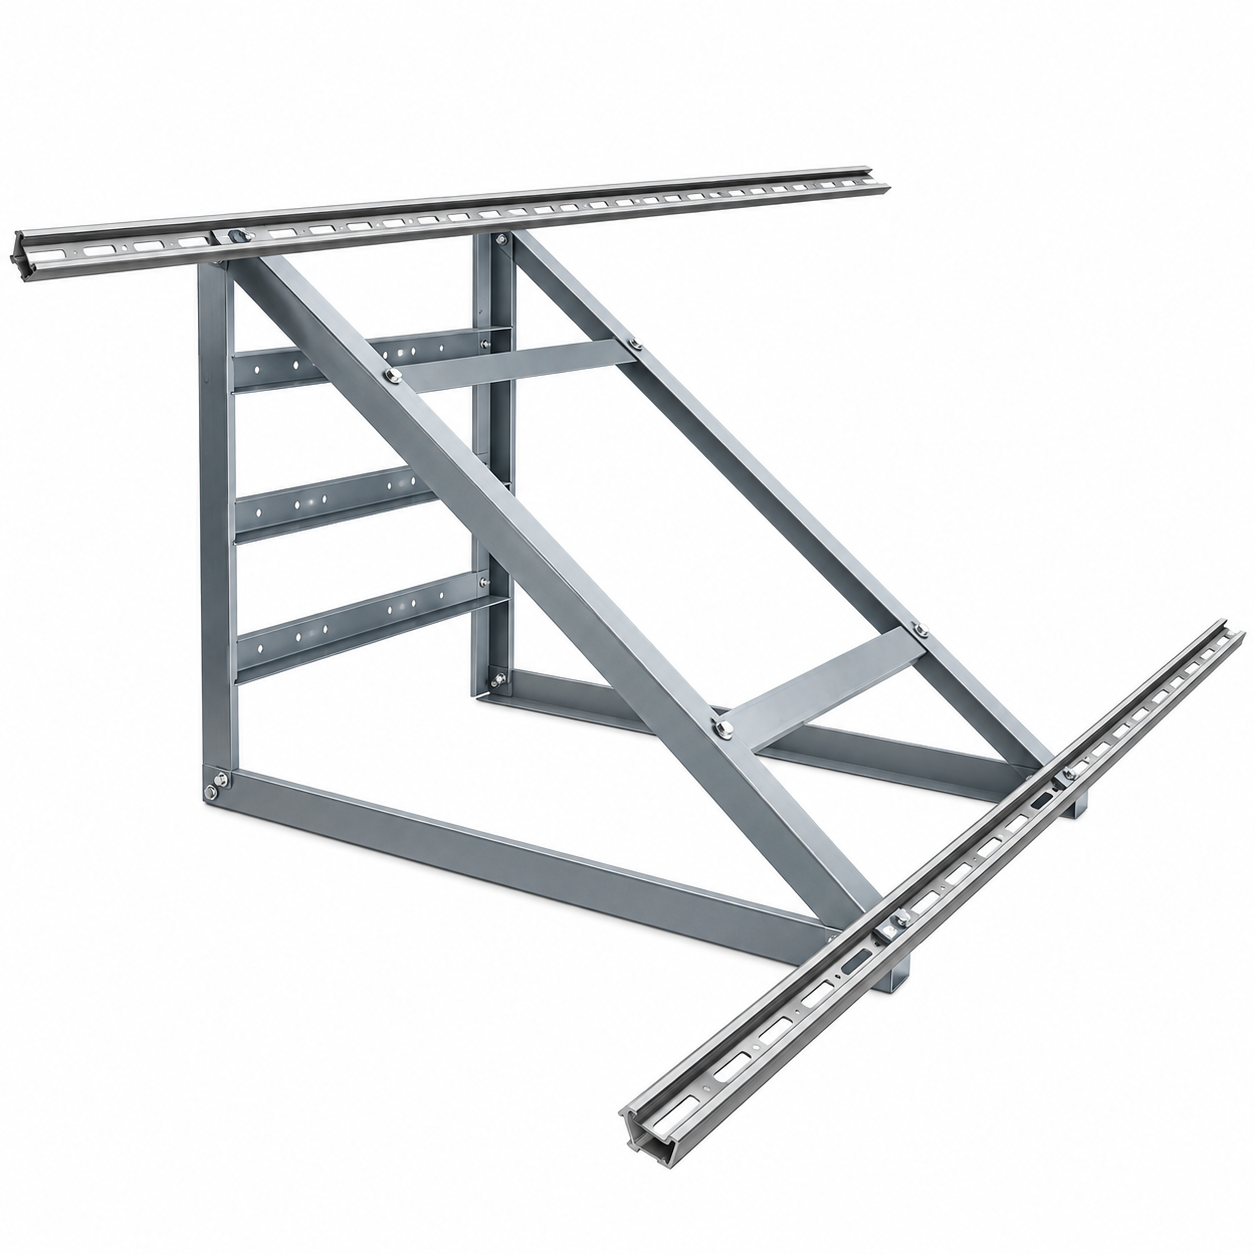
Adjustable versions add a pivoting joint and a locking sector so the tilt angle can be changed seasonally or set during commissioning. The pivot hardware is the critical component: it carries the full wind moment of the array, so it is usually machined rather than stamped, and it is normally stainless steel rather than coated carbon steel.
Equipment and Component Mounting Brackets
Solar installations also need mounting hardware for the equipment side of the system: inverters, combiner boxes, DC isolators, and cable management. These brackets must carry a static load rather than a wind load, but they face the same corrosion environment, so material selection matters just as much.
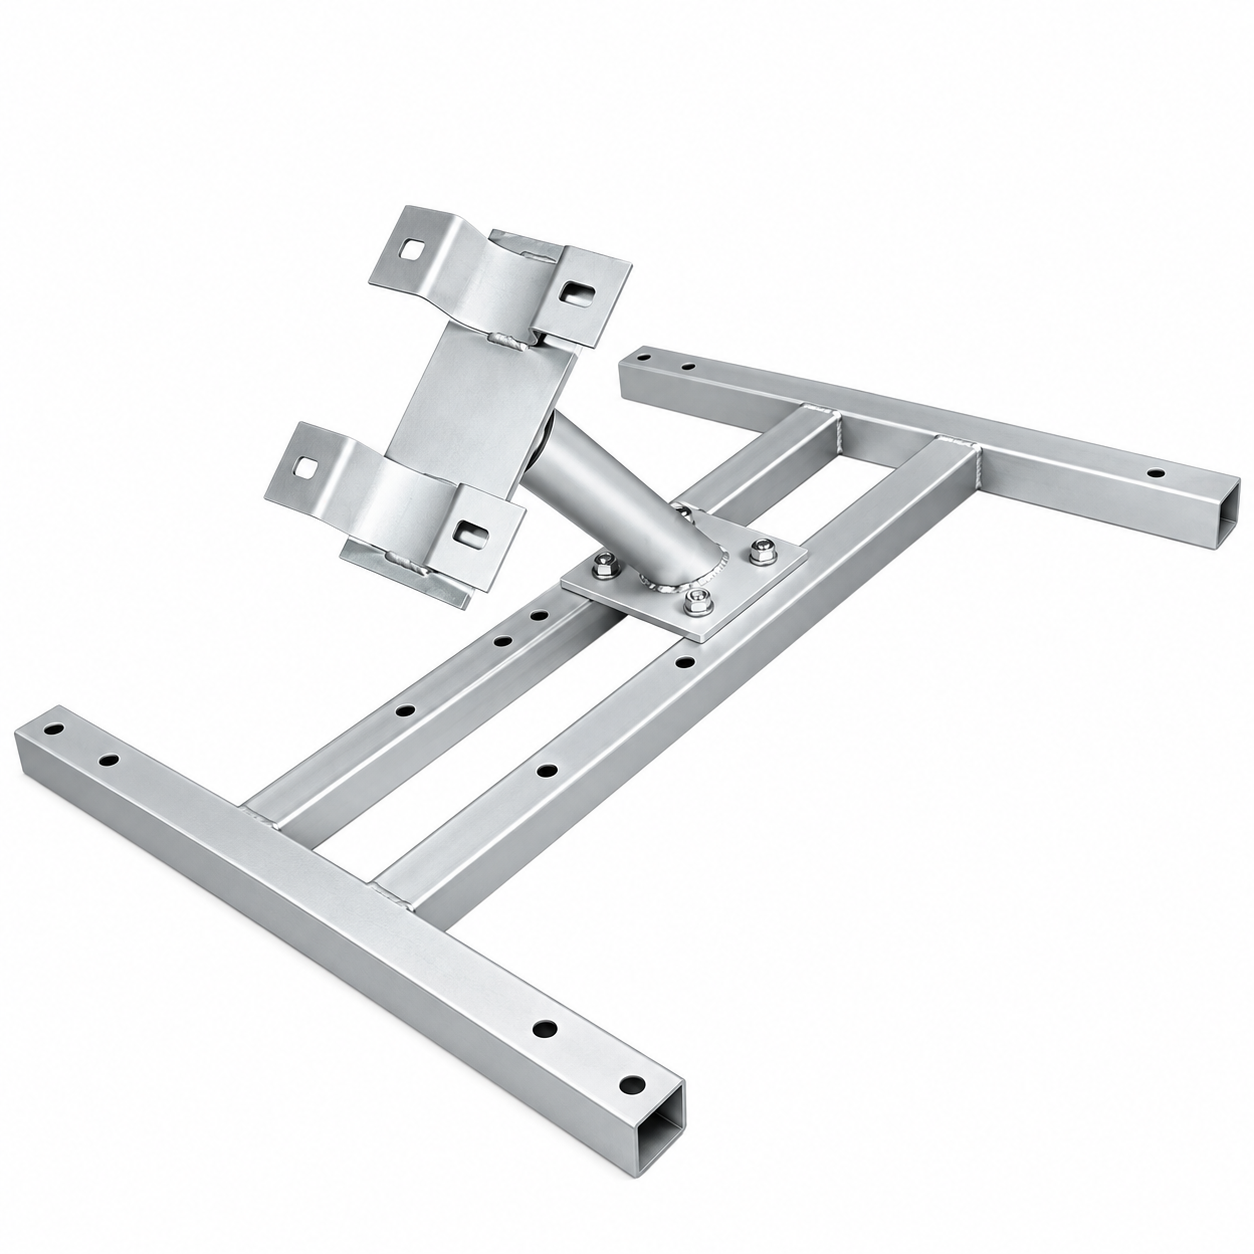
Wall-mounted equipment brackets are typically formed from 2 to 4 mm steel with a powder coat or hot-dip galvanized finish, and are supplied with stainless fasteners. Where an inverter needs to stand off from the wall for airflow clearance, an adjustable support arm holds the enclosure at the required distance.
Ready to specify? Our product page lists the full L-foot specification — alloy, dimensions, anodizing thickness, gasket grade, fastener pairing, and custom leg height options. View L-Foot Bracket Specifications →
What This Means for Your Project
- One supplier for the mounting package. L-feet, rails, clamps, pole mounts, tilt frames, and equipment brackets from a single factory means one quality system, one set of material certificates, and one shipment — instead of coordinating three or four vendors.
- Same inspection standard across every part. Every component in the package passes the same incoming material verification (spectrometer per heat lot) and the same dimensional inspection (Zeiss CMM).
- Custom fabrication is routine, not a special request. If your layout needs a 140 mm leg instead of 90 mm, or a wider base plate for a specific purlin spacing, extrusion and forming tools accommodate it without new die investment for most sizes.
- Mixed-material corrosion control. When one supplier produces the aluminum brackets and the stainless fasteners, the metal pairing is controlled at the design stage rather than discovered on site.
Mounting Component Capability at VOLCRIX
- Swiss turning: 60+ Japanese Star machines — stainless fasteners, threaded studs, pivot pins, custom bolts
- Stamping: 40 presses from 5 to 200 tons — L-feet, clamps, bracket plates, equipment mounts, 0.1-6 mm thickness
- Aluminum extrusion: custom L-feet, rails, and frame profiles to your cross-section drawing
- Injection molding: 20 presses — EPDM gasket alternatives, plastic end caps, cable clips, cable management components
- Springs: 60 coiling machines — torsion springs and retaining clips for adjustable tilt mechanisms
- Finishing: anodizing, electro-zinc plating, hot-dip galvanizing, powder coat, laser marking
- Quality systems: ISO 9001:2015 and IATF 16949, PPAP level 3 documentation available
L-Foot Bracket Specifications at a Glance
Standard production: 6005-T5 extruded aluminum, 4-6 mm thickness, 60 x 50 mm base, 60-120 mm leg height, M8/M10 slotted hole, anodized 12-25 micron with EPDM gasket. Custom leg heights from 40 to 200 mm are available without new tooling cost. Full specifications, material options, and the RFQ checklist are on our product page: Aluminum Solar L-Foot Bracket — specifications & quote →
Frequently Asked Questions
What is a metal roof L-foot solar mounting bracket?
A metal roof L-foot (also called L bracket) is an L-shaped structural component that connects solar panel mounting rails to the metal roof surface. The vertical leg bolts to the aluminum rail using an M8 or M10 bolt, while the horizontal leg fastens through the roof sheet into the underlying purlin or rafter. Most L-feet include a pre-installed EPDM rubber gasket on the base to seal the penetration against water ingress. Standard materials are 6005-T5 aluminum (anodized) or SUS 304 stainless steel.
What is the difference between an L-foot and a hanger bolt?
An L-foot sits on top of the roof sheet and fastens through it — the bracket body remains visible above the roof surface. A hanger bolt replaces the fastener itself: a threaded rod is driven through the roof sheet into the rafter below, and an L-foot adapter plate is then threaded onto the exposed stud. Hanger bolt systems are common on corrugated and trapezoidal metal roofs where the fastener must reach deep structure. L-foot-only systems work better on R-panel and standing seam where a clamp or short fastener is sufficient.
Which metal roof types work with L-foot brackets?
L-feet work with four common metal roof profiles: trapezoidal (most common in commercial construction — fasten at the high rib), corrugated (sine-wave profile — requires an EPDM-backed bracket shaped to the wave), R-panel (ribbed panel with flat top — most straightforward L-foot installation), and standing seam (raised folded seam — typically requires a non-penetrating seam clamp rather than a drilled L-foot). Always confirm your exact roof profile before ordering, because bracket geometry and gasket shape differ between profiles.
What material should L-feet be made from?
6005-T5 extruded aluminum with clear or black anodizing is the industry standard for L-feet because of its strength-to-weight ratio, corrosion resistance, and cost. Minimum tensile strength is 260 MPa with yield strength around 240 MPa. For coastal or highly corrosive installations, SUS 304 or SUS 316 stainless steel L-feet are preferred, though they cost three to five times more. Some suppliers offer zinc-aluminum-magnesium (Zn-Al-Mg) coated steel as a mid-cost alternative. Never mix bare aluminum L-feet with uncoated carbon steel bolts — galvanic corrosion will attack the aluminum within two to three years.
What wind and snow loads must L-feet be rated for?
L-foot load ratings are governed by the project’s structural code, not by the bracket alone. Common standards are ASCE 7-16 and ASCE 7-22 in the United States, AS/NZS 1170.2:2021 in Australia and New Zealand, and EN 1991-1-4 in Europe. Typical design wind speeds range from 40 m/s to 60 m/s depending on region and roof height. Snow load design typically ranges from 1.4 kN/m² to 2.4 kN/m². L-foot spacing is calculated from the rail span table, not chosen arbitrarily — typical residential spacing is 1.2 to 1.8 m, dropping to 0.9 m in high-wind coastal zones.
What is the correct installation torque for L-foot bolts?
Rail-to-L-foot bolts (usually M8 stainless steel) are typically torqued to 15 to 20 N·m (11 to 15 ft-lb). Roof fasteners (usually M6.3 or M8 self-drilling screws into steel purlin) are typically torqued to 8 to 12 N·m. Over-torquing crushes the EPDM gasket and creates a leak path; under-torquing allows vibration loosening under wind loading. Always follow the specific racking manufacturer’s published torque table — values differ between systems and fastener grades. Use a calibrated torque wrench, not an impact driver.
How much do metal roof L-foot brackets cost?
Standard 6005-T5 anodized aluminum L-feet cost roughly USD 0.60 to 2.50 per piece at container volumes (10,000+ pieces), depending on size, anodizing thickness, and whether the EPDM gasket and stainless fasteners are included. Stainless steel 304 L-feet run USD 2.50 to 6.00 per piece. Freight from China to Australia or Europe adds roughly 3 to 8 percent to landed cost at container volume. A typical 10 kW residential system uses 20 to 40 L-feet.
How do I evaluate an L-foot supplier?
Check five things. First, material certification: request the aluminum mill certificate showing 6005-T5 alloy and mechanical properties. Second, anodizing thickness: require a minimum of 12 microns (class II) and ask for XRF test data. Third, gasket quality: EPDM must be UV-stabilized and rated for 25 years outdoor exposure, not cheap neoprene. Fourth, fastener grade: stainless steel A2-70 or A4-80, not zinc-plated carbon steel. Fifth, sample and test: install three brackets on an off-cut of your actual roof profile and hose-test them before committing to a full order.
Are L-feet compatible with all solar rail systems?
L-feet are generally universal but the bolt slot geometry must match the rail channel. Most solar rails use a standard T-slot or channel profile (40 mm or 45 mm nominal), and most L-feet use an M8 or M10 slotted hole to accommodate. Before ordering, confirm three dimensions: the rail channel width, the required bolt diameter, and the required rail height above the roof surface. Rail height matters because it sets airflow clearance under the panels, which affects both module temperature and wind uplift loading.
What are the most common L-foot installation mistakes?
Five failures we see repeatedly. First, fastening only into roof sheet rather than into the purlin or rafter — the bracket pulls out under wind uplift. Second, omitting or mis-seating the EPDM gasket — leaks appear at the first heavy rain. Third, over-torquing with an impact driver — crushed gasket, deformed bracket. Fourth, uneven base contact on profiled roof — the bracket torques down at an angle and cracks at the bend radius. Fifth, mixing aluminum brackets with uncoated steel fasteners — galvanic corrosion destroys the bracket in coastal environments within two to three seasons.
Does VOLCRIX manufacture complete solar mounting systems or only L-feet?
VOLCRIX manufactures the full family of solar mounting hardware: L-feet and roof brackets, pole-mount bracket assemblies with U-bolt clamps, fixed and adjustable tilt frames, rail components, and equipment mounting brackets for inverters and combiner boxes. Production runs on 60+ Swiss turning machines, 40 stamping presses from 5 to 200 tons, aluminum extrusion, 20 injection molding presses, and 60 spring coiling machines — all under ISO 9001:2015 and IATF 16949 quality systems.
When should I use a pole-mounted bracket instead of a roof L-foot?
Use a pole-mounted bracket when roof penetration is not permitted, when the roof structure cannot carry the additional wind load, or on ground-mount, carport, and agricultural installations where the array is not on a building at all. Pole mounts give unlimited adjustment along the pole for tilt angle and row spacing, and they avoid every roof warranty issue that a drilled penetration creates.
What material are the stainless steel pole mount brackets made from?
Pole-mount brackets are typically manufactured from SUS 304 stainless steel for inland and moderate environments, and SUS 316 for coastal, offshore, and high-humidity installations where chloride exposure would attack 304 over time. The U-bolts that clamp the bracket to the pole are always stainless steel, even when the bracket body is anodized aluminum, because permanent aluminum-to-steel contact with moisture present causes galvanic corrosion.
Need Metal Roof L-Foot Solar Mounting Brackets?
Free DFM review · Quote within 24 hours · Prototype in 7-15 days
Related Guides
- Custom Metal Stamping Parts — progressive die stamping for solar mounting hardware
- Precision Shafts & Turned Parts — stainless fasteners and mounting studs
- HMLV vs LMHV Manufacturing — how prototype and production volumes are handled
- VOLCRIX History — 35 years of precision metal manufacturing since 1991
- Quality Control — ISO 9001 and IATF 16949 inspection processes
Standards and Compliance Referenced
- ASCE 7-16 / ASCE 7-22 — Minimum design loads, United States
- AS/NZS 1170.2:2021 — Wind actions, Australia and New Zealand
- EN 1991-1-4 — Eurocode 1: Actions on structures, wind actions
- ASTM B221 — Aluminum extruded bars, rods, shapes and tubes
- ASTM B568 — Coating thickness measurement by X-ray spectrometry
- MIL-A-8625 — Anodic coatings for aluminum and aluminum alloys
- ASTM A123 — Hot-dip galvanizing of steel products
- ISO 9001:2015 / IATF 16949 — VOLCRIX quality systems
For project-specific compliance questions, contact our engineering team.